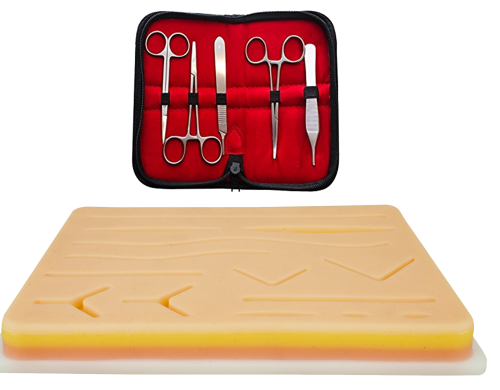
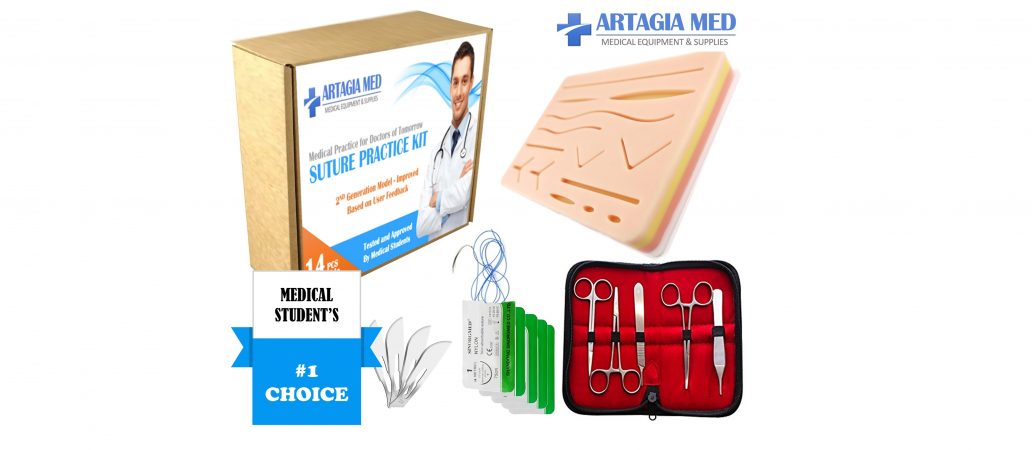
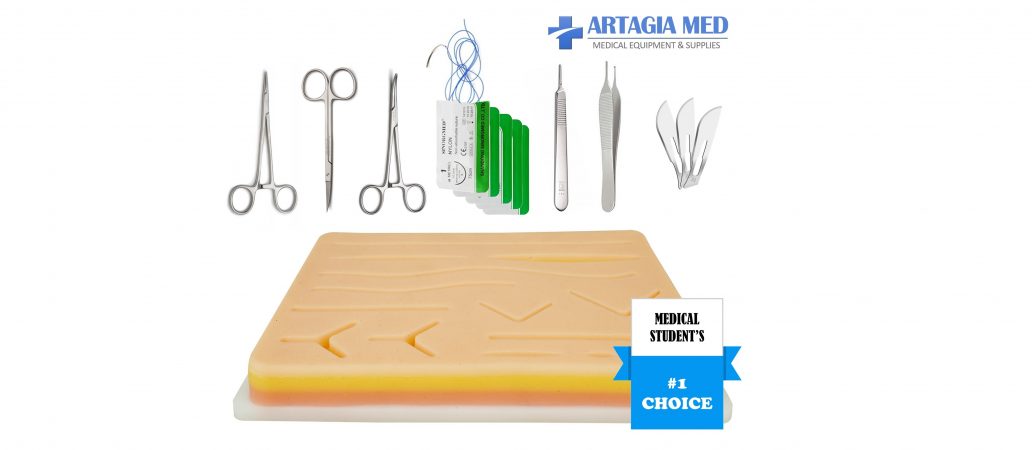
Practice Suture Kit by ARTAGIA MED
The Practice Suture Kit by ARTAGIA MED is a complete surgical practice kit for medical students everywhere. It contains everything that is needed to practice stitching in a way that is as near to real flesh as possible. The pad itself is one of the keys to success with this suture kit.
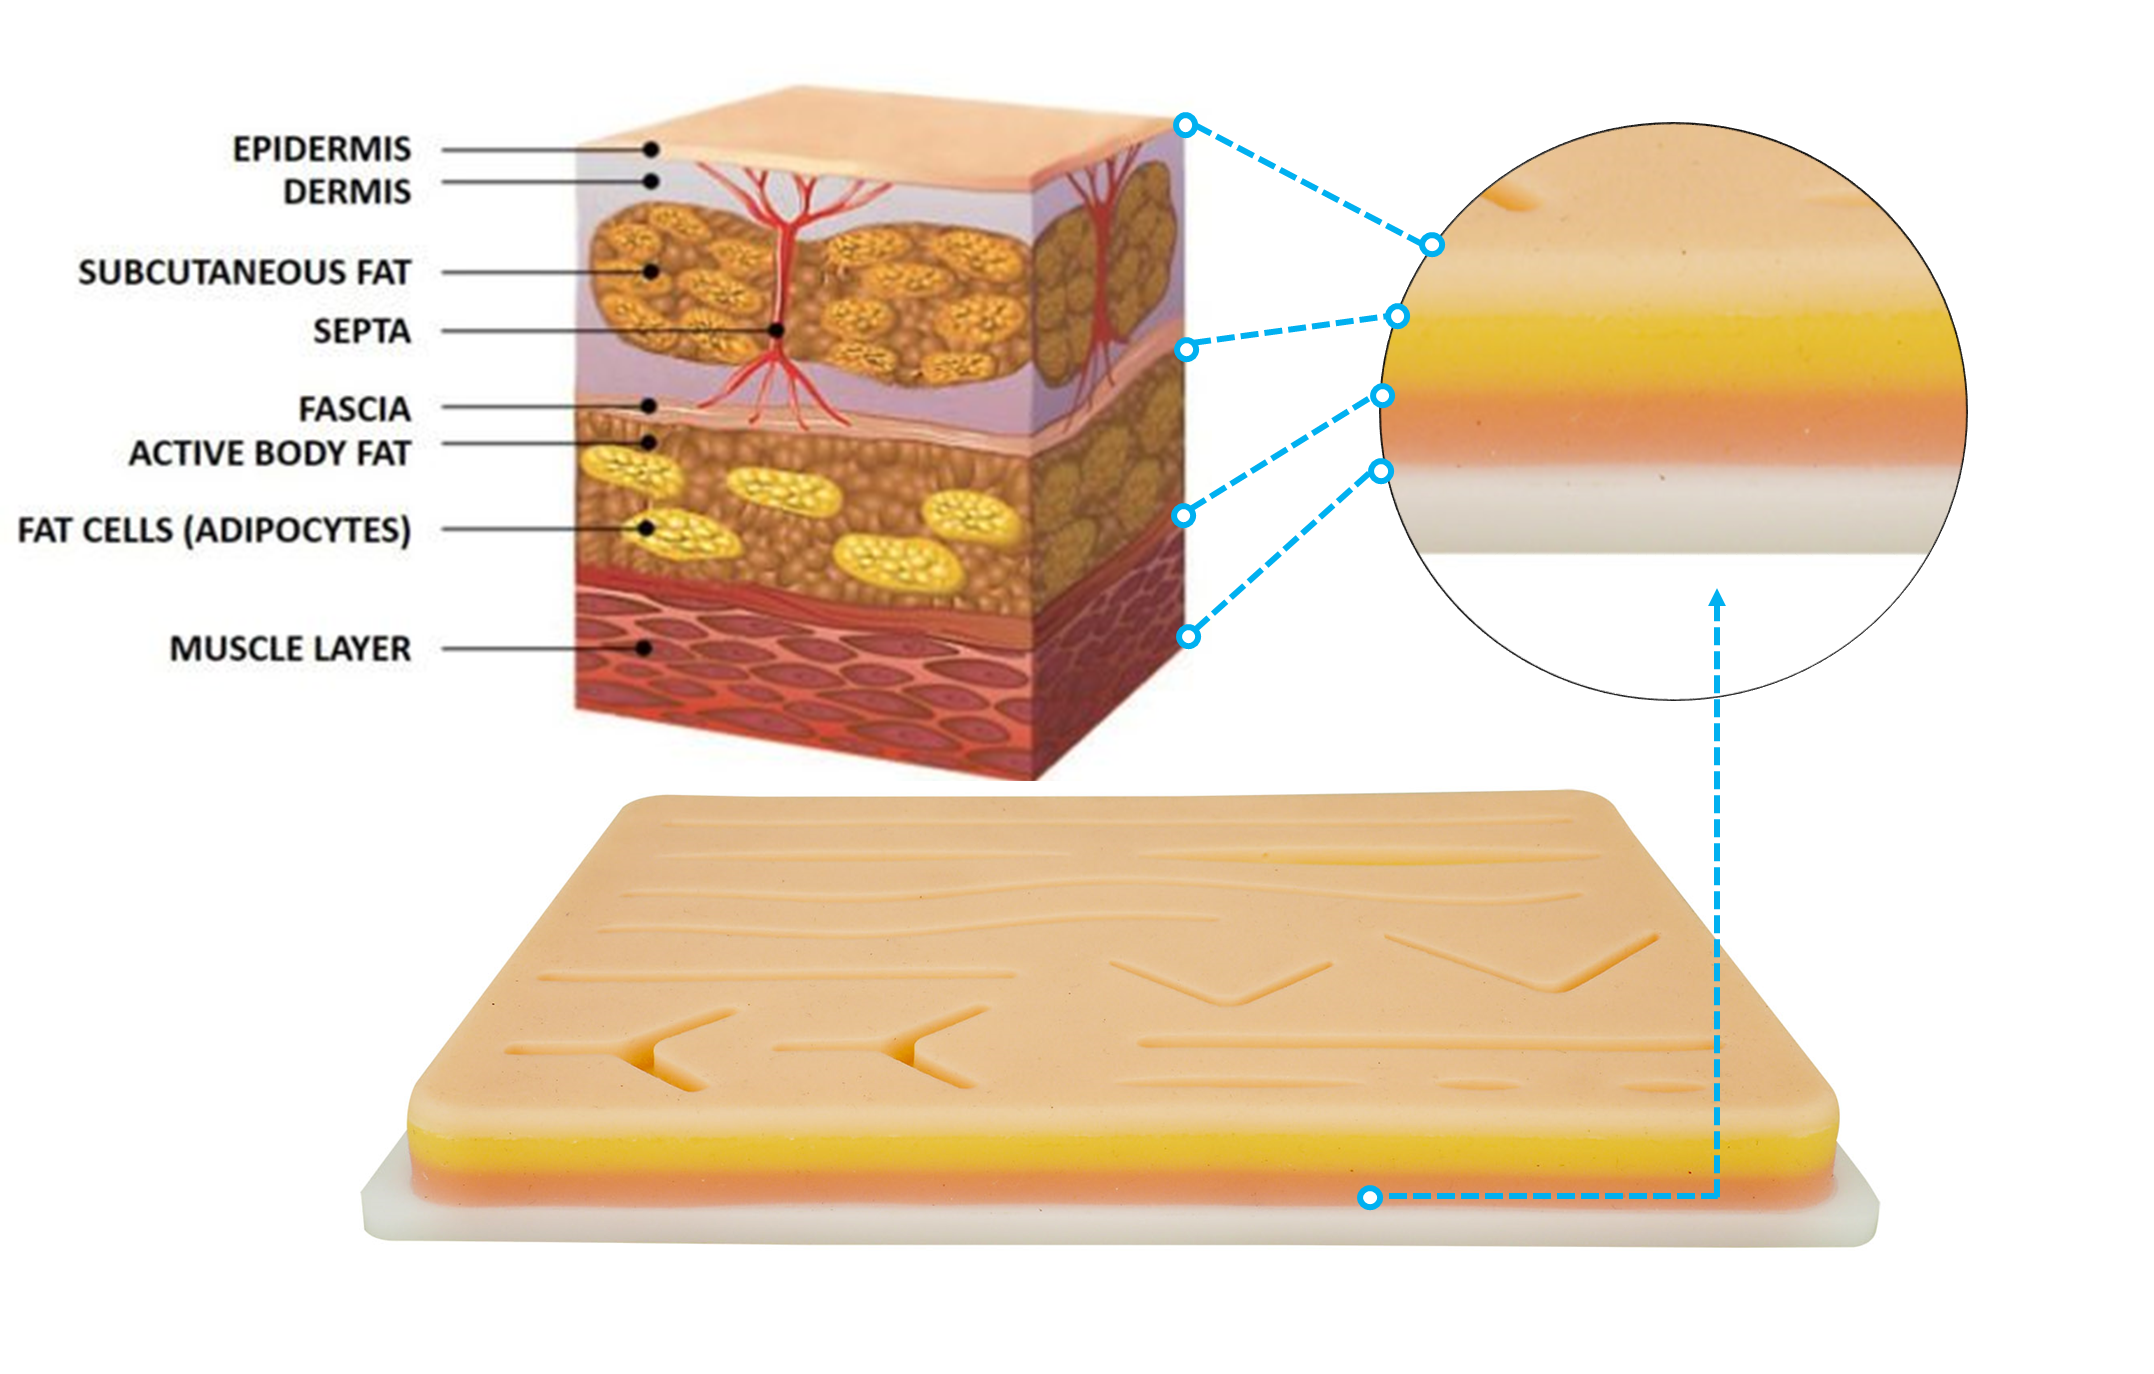
The suture practice pad is DURABLE AND HIGH QUALITY and is designed to replicate the anatomical structure of living human flesh. This suture practice pad includes 3 layers: skin, fat and muscle. Thus, the ARTAGIA MED suture pad provides the best human tissue simulation imaginable.
ANATOMICAL LIKENESS
Our suture pad is designed to replicate the anatomical structure of human tissue including 3 layers: skin, fat and muscle, to provide the best human tissue simulation possible.
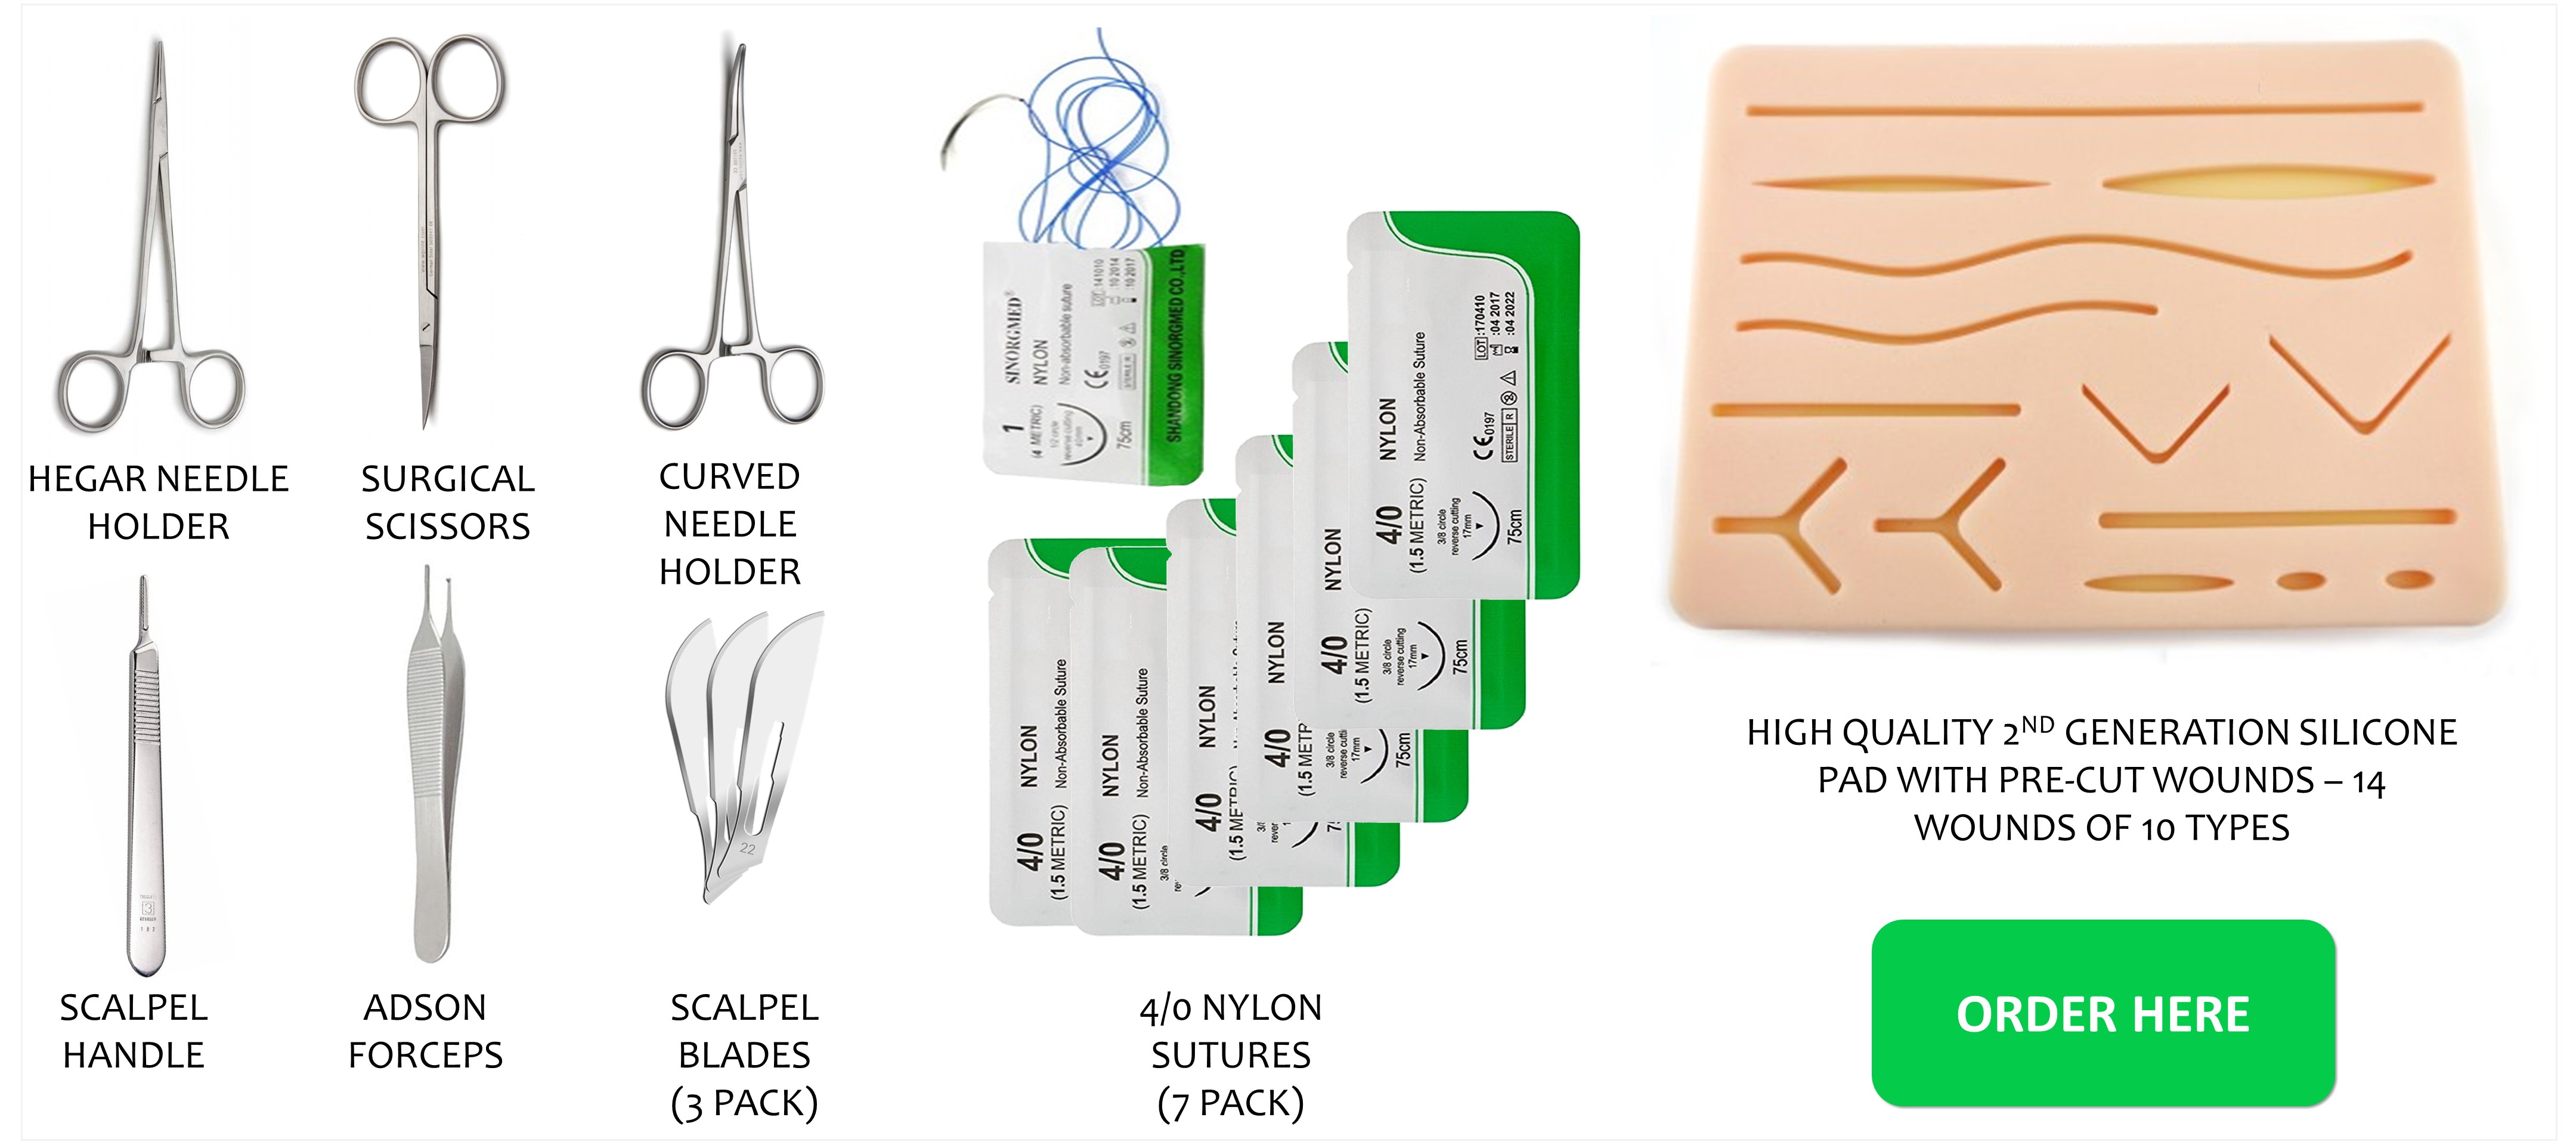
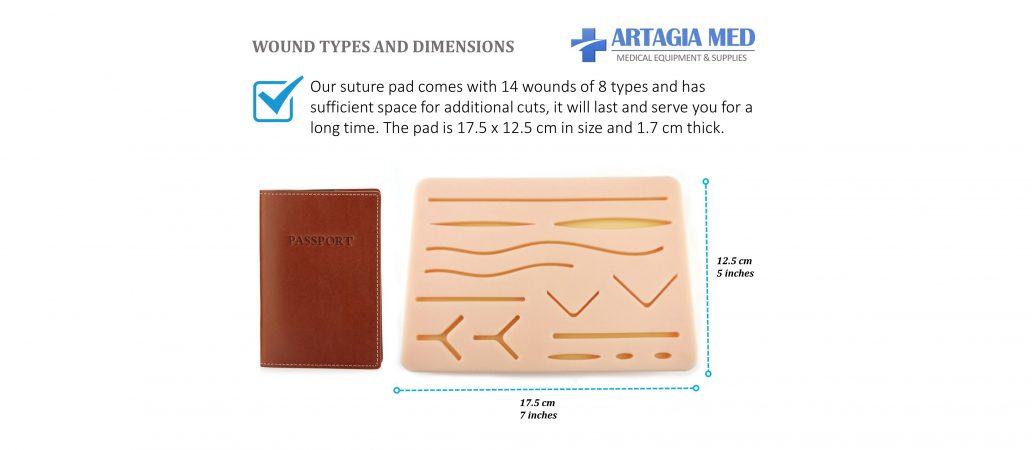
It comes preset with 8 types in 14 distinct wounds and provides ample space for additional cuts. The large suture pad is 17 cm x 13 cm and will last and serve well for an extensive period.
By providing realistic textures in a variety of wounds, this silicone suture pad is extremely realistic in helping students close wounds in a real-world setting. It ensures that the med student practicing suturing techniques is given every advantage with the most realistic simulation possible.
Most similar products available today lack this attention to detail which means that students using these products will not be ready to take their final practicum.
Students using the ARTAGIA MED suture pad learn the right way and provide the highest level of service to their patients.
One of the key differences between the ARTAGIA MED suture pad and others is the built in “mesh” layer situated between the skin and fat ‘tissue’ layers. This new and improved pad is a second-generation model, designed so that piercing the skin with the suturing needle will not only look real, but feel real as well. Pushing through the skin to the mesh layer provides the same feel as human flesh so that a student will know when about to push into the fat layer. Thus, they can easily learn to avoid pulling fat tissue into their stitches.

2ND GENERATION MODEL
Our latest product update features a built in “mesh” layer between skin and fat layers. This feature improves durability of the suture pad and prevents rips in the skin layer, for most realistic simulation.
Ongoing practice with this suture kit is guaranteed to make you confident in dealing with all types of wounds during critical times.
The mesh layer also adds to the durability and longevity of your suture practice pad, providing well over 100 uses.
Tested by Medical Students FOR Medical Students!
To be sure the ARTAGIA MED suture kit and pad will do the job as intended, extensive testing by medical students was employed. The students were instructed to carefully asess each item in the suture kit and provide feedback for improvements.
In fact, this testing is continual, allowing Artagia Med to continue improving the product. The pad was assessed separate from the kit so that we could determine both the best structure for the pad and the best elements to be included in the kit. The outcome is the highest-quality suture training kit possible for the best price – providing students with the best value in suture training kits anywhere.
This is a COMPLETE SUTURE PRACTICE kit containing everything needed to practice suturing techniques anywhere…even while between Liberal Arts classes.
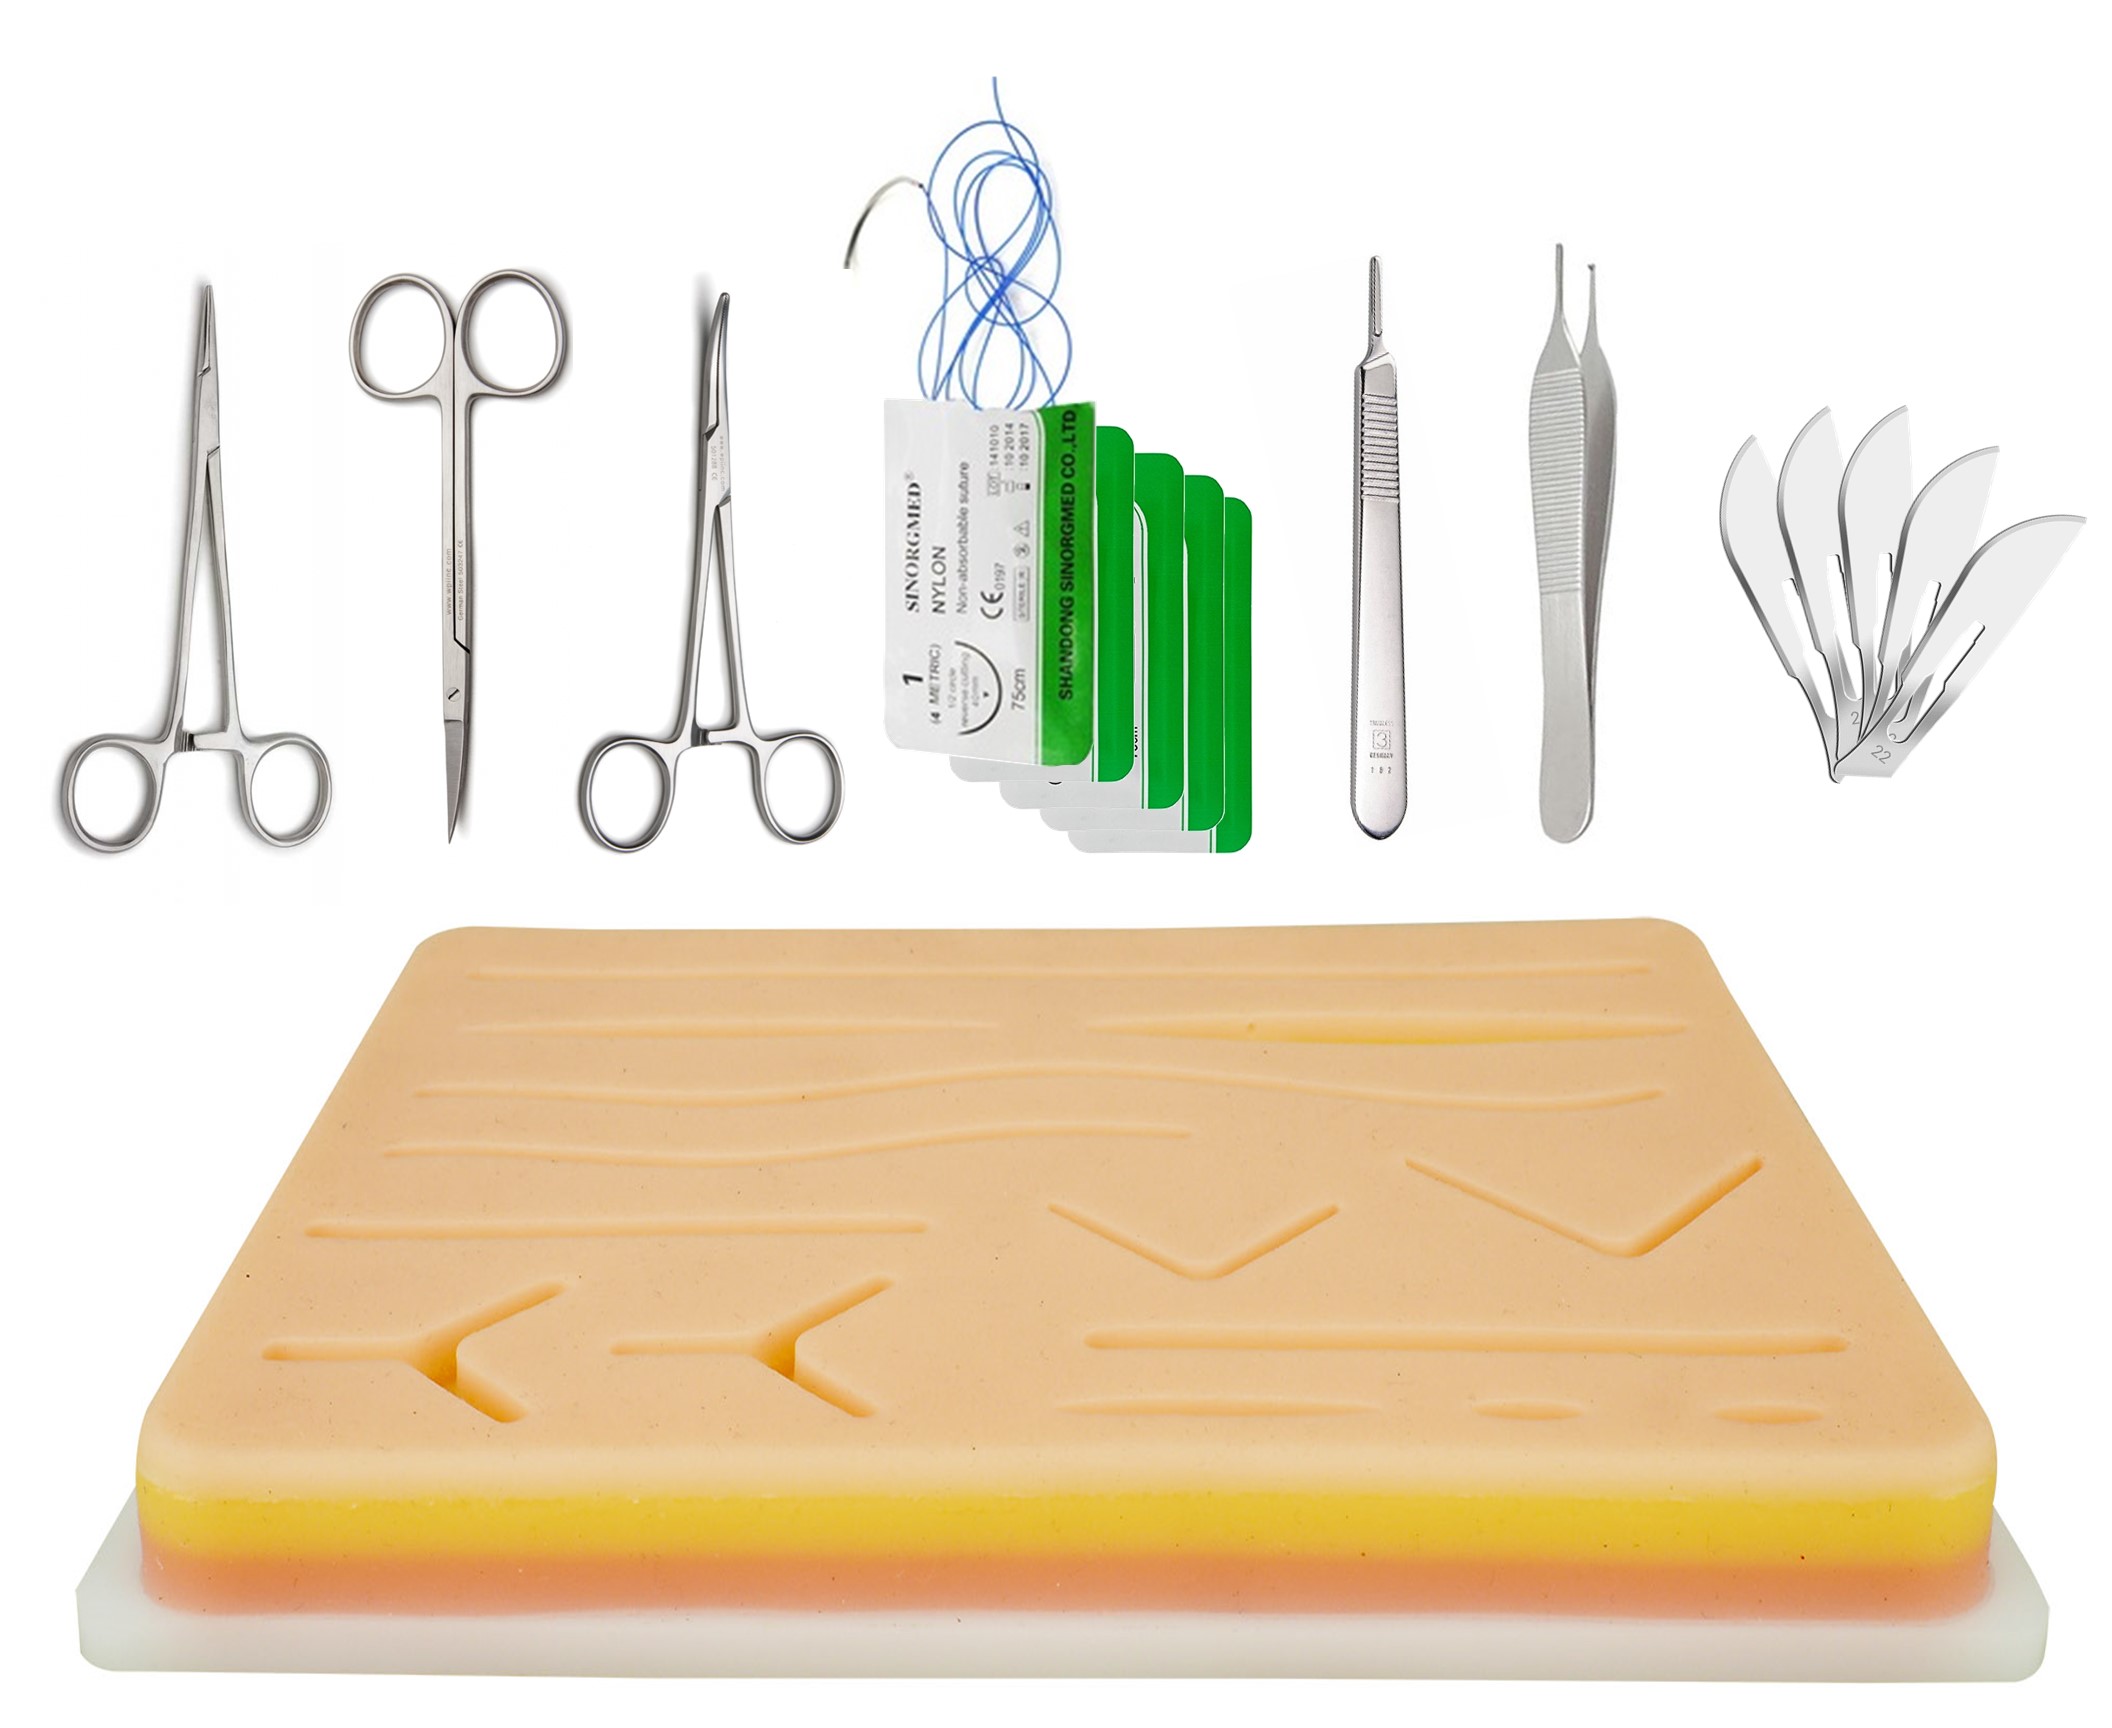
The ARTAGIA MED suture practice kit contains:
- Patented suture practice pad
- Hegar needle holder
- Adson forceps
- Suture scissors
- Scalpel blades (5-pack)
- Suture thread (7-pack)
- Convenient storage/carrying case

✔ DURABLE AND HIGH QUALITY
Our suture pad is designed to replicate the anatomical structure of human tissue including 3 layers: skin, fat and muscle, to provide the best human tissue simulation possible. It comes with 14 wounds of 8 types and has sufficient space for additional cuts.

✔ NEW AND IMPROVED
Second generation suture skin pad! Our latest product update features a built in "mesh layer" between the skin and the fat layers. This feature improves durability of the suture training pad and prevents rips of the skin layer for most realistic simulation, a feature that competitors cheaply made products lack.

✔ TESTED BY MEDICAL STUDENTS
We have done extensive testing with medical students and had them provide feedback and perfect our product! We strive to improve the product features with each new release to bring you the best product possible and help you learn to suture.

Gurpreet S
Medical ResidentIf you’re a medical student looking for ways to improve your suturing skills from home, this is a good investment to make. In fact, I heard about this from my professor and he mentioned that a lot of his students used silicone skin simulation pad to perfect their suture techniques. It’s not quite like reality but a definitely a good simulation!
Practice Makes Perfect
Suture Practice Makes Perfect Sutures
Although in more than 5000 years of suturing there has only been two major advances, this does not mean that nothing more may be learned. To be sure, suturing techniques have improved over time and new techniques are developed often. Still, the basics such as learning how to properly tie a square knot cannot be understated. Whether practicing your one or two-handed ties or by using an instrument, any suture practice kit is only as good as the student who makes use of it.The ARTIGIA MED surgery practice kit was designed to encourage repeated use so that students need not fear limiting their practice to a few sessions. Medical practices are called such for a reason: Practice is the key to a successful medical career. This kit cannot be understated…it contains everything a med student wanting to learn to make perfect sutures needs for success AND at a price that can’t be beat.
The ARTIGIA MED suture practice kit is strongly recommended for medical students everywhere…especially those trapped in Liberal Arts for a semester or two.


Practice Makes Perfect
Get Suture Training at Home
Our large suture pad (17 cm x 13 cm) is a great suture practice tool and can be used for extra practice, study or teaching. The suture pad is made of the highest quality silicone material, comes with three layers of tissue: skin, muscle and fat, providing the next best anatomical simulation to practice on, after an actual human flesh or a dead animal. There are 14 cuts of various types (10 types), width and depth and lots of space to add additional cuts.Best Suture Practice Kit and Suturing Techniques
 It has been said that if you want something done right, you’ve got to do it yourself. This is especially good advice when it comes to suture practice. Kits are available today to help and these are strongly recommended for many reasons. However, anyone who needs to practice suture techniques would do well to possess a variety of tools.
Even with the best tools at one’s disposal, if the user does not know how to properly use the tools, they are useless. So, the following information will prepare any student learning to suture.
After a brief introduction to the art of the suture, we share the top suturing techniques as provided by the world’s leading educators.
Too, as every student knows, there are always requirements which must be met for certification of a skill. Along with providing the necessary practice and general passage requirements, readers will learn the various ways to practice their skills. Remember that suturing in the real world is done on human flesh – the nearer a material can mimic that reality, the better the student will become at suturing.
Naturally, the suture is an integral part of medicine today. At some point in their career, every medical professional will encounter sutures, whether put there by themselves or someone else. That said, someone had to have been the first to use sewing materials to seal a wound. Who was it?
Introduction to the Suture
Sutures, or stitches as they are commonly-called, are a mainstay of modern medical and surgical practices. Despite some modern methods of closing wounds involving various glues, properly applying sutures to an open wound remains a necessary element of medical training.
In a variety of settings, medical professionals must apply sutures to patients:
- Emergency Room personnel must often quickly assess and close minor wounds to stop unnecessary bleeding while larger wounds are managed.
- Patients in office often have need for stitches.
- Surgeries require stitches, both externally and internally.
- Outpatient procedures often require some stitching of patients.
- Normal tearing caused during childbirth frequently requires suturing.
In short, mastering the art of suturing techniques is a must for anyone entering the medical field because at some point, stitching up a patient will be necessary.
A Brief History of Suturing
Stitching flesh together is an art that stretches into antiquities. The first reports of the use of sutures dates to ancient Egypt…roughly 3000 B.C. Around 500 B.C., the Indian physician Susruta described his technique for suturing a wound along with how to develop various materials needed for the work. Hippocrates and even the Roman physician Galen left detailed records of the use of stitches.
When one thinks about it though, the development of stitches, or sutures and suturing techniques in early human history makes perfect sense. Wars were fought up close, with sharp weapons, and frequently. Military physicians were the first to begin using various materials to close wounds. Without a doubt, the first suture practice kit or suture training kits were developed by ancient army doctors.
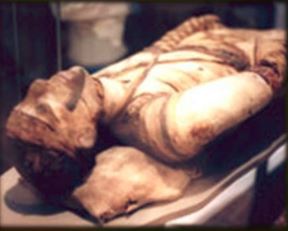 As for exactly who, well sadly, that name is lost to history. Certainly, the first to stich someone together was likely Egyptian, but no one can say for sure. One mummy dating to 1100 B.C. has sutures, but ancient writings place their development much earlier.
For the better part of history, the materials used to suture wounds included flax, hemp, cotton, hair, tendons, arteries, strips of muscle, silk, and catgut (sheep intestines). The needles were generally made from copper, silver, or bronze. In fact, the only major developments in thousands of years of suturing occurred less than 150 years ago.
Joseph Lister determined that suture threads should be sterilized prior to use and developed a method for doing so by the late 1860s. Although his technique did not achieve the desired results, it did start a sound and wise trend in the medical profession – sterilization of any equipment which contacts a patient.
The only other major step in suturing came along in the 1930s after chemists developed synthetic tread. Synthetic threat rapidly grew in demand and with the demand came a variety of types, many of which were medical in nature. By the 1970s, synthetic polymer fibers became the mainstay of the surgical industry. Silk sutures continue in use, but through much of the industrial world, catgut and other natural materials are no longer acceptable.
As for techniques, these have largely remained the same for thousands of years, with but minor adjustments owing the materials used.
Simple Suturing Techniques Medical Professionals Can (and Should) Master
Suturing consists of using a needle and thread to close a wound. Although this sounds simple, in modern medicine a variety of stitching techniques are used depending on the location and complexity of the wound. While any good suture practice kit will provide the tools needed to learn suturing techniques, the skills are best learned by video or live-demonstration.
That said, when learning how to suture, the seven most common techniques encountered are:
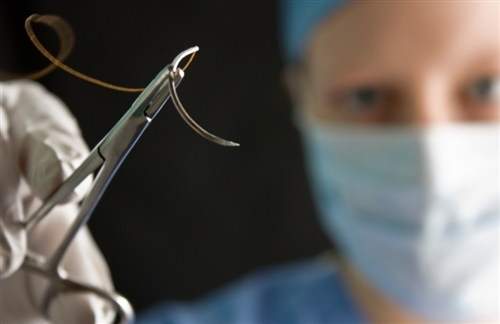
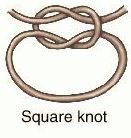 Basic square knot – The knot is the key to suturing and as any student with a suture practice pad already knows, tying the suture so that it does not come loose is vital for success in suturing. The square knot is achieved by simply folding the ends of the thread across each other, then drawing them tight. Next, tie the ends again by again folding the ends in the same manner, then drawing the knot tight. See image to right. Note that the two bound ends of the thread shown are known as “throws.”
- Two-handed square knot – With the two-handed square knot, a surgeon can quickly close sutures by using the thumb and forefinger of his less dominant hand to form the loop needed to stitch most wounds.
- One-handed square knot – The one-handed square knot is rather misnamed because really, both hands are often used in the technique. It is so-named because it largely relies on the right hand of the surgeon performing the suture, while an assistant helps. Thus, the surgeon only uses one-hand to tie the knot and once skilled in its use, an assistant is not needed. By interweaving the thread through the fingers of his hand, the surgeon can manipulate thumb and fingers such that the knot may be put in place by hand, then “slipped” onto the wound just prior to tightening.
- Instrument-tie square knot – In all cases of suturing, there is a short end of the thread and a long end which serves as guides to proper technique. This is most importantly noted when using an instrument such as a needle holder to perform the stitching of sutures. The needle holder will operate the short end of the suture thread while the long end will be manipulated by the free hand.
- Loading a needle holder – is one of the required elements of every suture training. Just remember to hold the curved needle about 2/3 of the way down using the driver tips such that the needle makes a right angle to the driver. This will allow for a proper loading of the needle holder.
- Simple interrupted stitch – Best used with toothed forceps, insert the needle into the skin, perpendicular to the surface, pointing slightly away from the wound. Be sure to get both dermis and epidermis when stitching with the least subcutaneous fat as possible. Then stitch the opposite direction and from the other side of the wound such that the stitches are symmetrical and exactly mirror the same distance and depth.
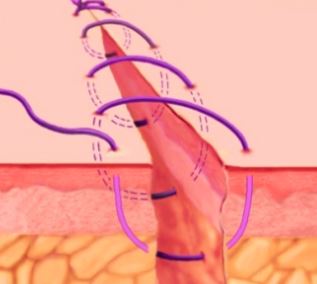 Simple running stitch – Rather than switching sides of the wound, simply start as you would the simple interrupted stitch and continue evenly stitching. Start with one side of the wound, bring the needle through the other side, then once the stitch is complete, continue the same pattern until finished, leaving the last loop for tying.
Aside from the simple suture techniques listed above, the types of sutures also commonly employed include:
- Vertical or mattress stitch
- Inverted subcutaneous stitch
- Running subcuticular stitch
Suture Practice Requirements for Medical Students
 Most programs require students master the two-handed, one-handed square knots, and instrument-tie square knots, how to load the needle driver, and how to suture tissue without tearing it or applying undue stress to the needle. Although your suture practice kit will provide the tools, these cannot replace hours of repetition needed for successful suture practice.
Of course, some of the things to be aware of and avoid while practicing suturing techniques are:
- Skin inversion is caused by failing to enter skin at a perpendicular angle
- Half-hitches rather than square knot occur when the knot is not carefully inspected prior to tightening.
- Air-knots occur when insufficient tension is applied to the knots and between the surface and the knot.
That said, your surgery practice kit will contain everything needed for hours of repetition needed to master the art of sutures.
Various Ways to Practice Suture Techniques
Repetition has been called the mother of learning and when it comes to suture practice, this is certainly true. The medical stiches kit may provide the tools needed, but without extensive and repeated practice they may remain in the kit.
In the past, budding surgeons have used every manner of flesh to practice, from bananas to raw chicken to pig’s feet. Really, any of these will do and do well, for each can mimic human flesh in both the look and feel needed to understand how skin will move while suturing.
Of course, maintaining ready access to poultry or pork may not always be possible, especially in Liberal Arts classrooms. Not ripping on Liberal Arts…we’ve all benefited from the classes…but the classrooms are not equipped to store fresh meat like many of the medical training and life sciences rooms. For good reason then, most med students prefer the next method.
Practicing Sutures with a Silicone Pad
Silicone has radically altered human progress in more ways that can be written in a single book, but one of the best ways it has advanced the cause of medicine has been with the simple suture practice pad.
Made to look and feel like human skin, on the surface, all suture pads look pretty much alike. But, just as with people, the beauty at times is only skin deep.
What should you look for in a suture practice pad?
Naturally, natural…or as close to natural is best. Most suture practice kits contain a bit of information on suture techniques, suturing tips, and a nice silicone pad with a few choice gashes embedded in the practice pad. Yet, not every pad mimics human skin as well as others. Some are clearly inferior, containing but a single layer of silicone, as if that were all there is to skin.
Some do well with two layers, effectively mimicking the epidermis and the dermis, yet failing to properly account for subcutaneous fat. Using such a surgical kit for medical students is counterproductive at best because nearly every patient who will be encountered will have at least some fat below their skin tissue. And while the ideal scenario for a surgeon or any other medical personnel is to avoid getting fat caught within the stitching, without it, any suturing practice is incomplete.
It is the fat layer that causes the greatest difficulties for many when practicing suturing techniques. Hence, the silicone practice pad must contain a layer that mimics the malleability of subcutaneous fat. That said, consider now the new and improved…
NOTE: This suture practice kit is for demonstration purposes only; it is not intended for use on humans or animals.